
Pattern Type: Video Pattern Only By Tiny Crochet Lab
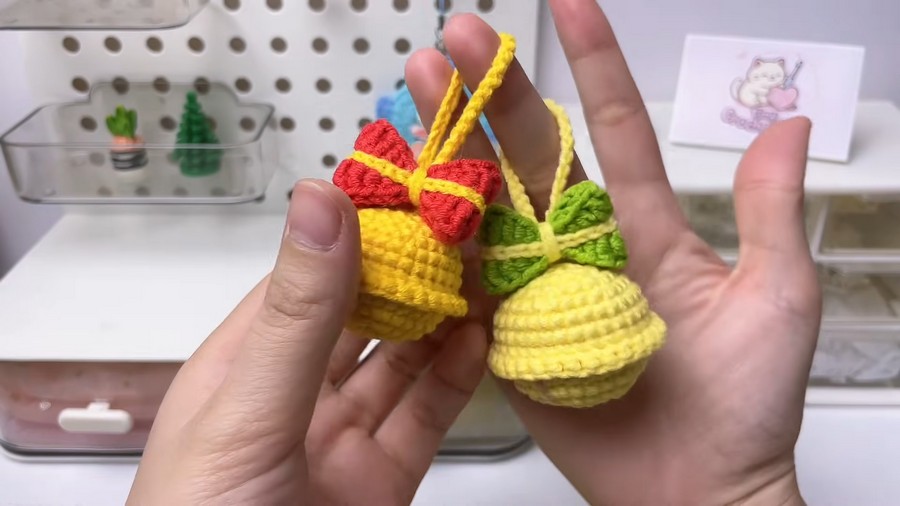
Hear that gentle jingle ringing through the crisp winter air? These charming crochet bell ornaments capture sweet holiday joy in a cute, spherical design! Colored in warm golden yellow and crowned with a crisp contrasting bow, each bell brings cheerful warmth wherever it hangs.
Crochet Christmas Bell Holiday Ornaments & Gifts

They look lovely as everyday home and room decorations on drawer pulls, wall hooks, or doorknobs. During the holidays, they shine as bright Christmas decorations on tree boughs or festive wreaths. Delightful, lightweight, and full of cheer, these handmade bells also make wonderful gifts for family, friends, and holiday party hosts.
Difficulty Level: Advanced Beginner
Why this difficulty?
This project is rated advanced beginner because it combines straightforward amigurumi shaping with clever texture techniques:
-
Two-Stage Body Construction: Crocheting Round 8 in the Back Loop Only (BLO) leaves a line of front loops open. Later, you must re-anchor your yarn and crochet directly into these exposed loops to form the signature protruding center rim of the bell.
-
Needle Sculpting: Creating the indented jingle-bell groove at the base requires threading yarn through the bottom and pulling it tight to sculpt the hollow shape.
-
Two-Sided Bow Shaping: Working along both sides of a foundation chain with rapid height transitions (sc, hdc, 5 dc, sl st) to form symmetrical bow loops.

Pattern Abbreviations
-
MR – Magic Ring
-
ch – Chain stitch
-
sc – Single crochet
-
hdc – Half double crochet
-
dc – Double crochet
-
inc – Increase (2 single crochets in the same stitch)
-
dec – Decrease (single crochet 2 stitches together)
-
BLO – Back loop only
-
sl st – Slip stitch
-
R – Round

Materials Needed
-
Yarn: 4-ply / DK weight yarn in:
-
Bright Yellow or Pastel Yellow (bell body and hanging loop)
-
Festive Red or Lime Green (bow)
-
Accent Yellow (bow center wrap)
-
-
Crochet Hook: Size 2.0 mm – 2.5 mm
-
Polyester Fiberfill Stuffing
-
Tapestry / Yarn Needle
-
Scissors
-
Craft Glue (optional, for securing the bow firmly to the crown)

Detailed Stitch Guide: The Most Challenging Techniques
1. Working the Raised Center Rim into Round 8
In Round 8, the bell body is worked in BLO, leaving the front loops open on the outside. After finishing and closing the sphere, you return to these loops:
-
Hold the closed bell upside down and locate the horizontal ridge of unworked front loops from Round 8.
-
Insert your hook under the first exposed front loop, yarn over with your main yellow yarn, and pull up a loop.
-
Chain 1 (or pull up a working loop), then work 1 single crochet directly into that loop.
-
Continue working 1 single crochet into each of the 30 exposed front loops around the entire circumference.
-
Join with a slip stitch to the first single crochet, fasten off, and weave the yarn end inside the bell.
(This creates the distinctive 3D collar seen on classic round sleigh bells).
2. Crocheting the Contoured Bow Wings
The bow is shaped without cutting the yarn by working along both edges of a starting chain:
-
Chain 22.
-
First Side: Insert hook into the 2nd chain from hook and work: 1 sc, 1 hdc, 5 dc, 1 hdc, 1 sc, 3 sl st (center cinch), 1 sc, 1 hdc, 5 dc, 1 hdc, 1 sc.
-
Do not fasten off. Rotate your piece upside down to access the unworked underside loops of the original chain.
-
Second Side: Work the exact mirror sequence across the bottom loops (1 sc, 1 hdc, 5 dc, 1 hdc, 1 sc, 3 sl st, 1 sc, 1 hdc, 5 dc, 1 hdc, 1 sc).
-
Slip stitch to the first stitch to join, then wrap contrasting yarn tightly around the center sl st groove to cinch the two wings into a bowtie.
Video Guide:
