
Subscribe to Handmade Park!
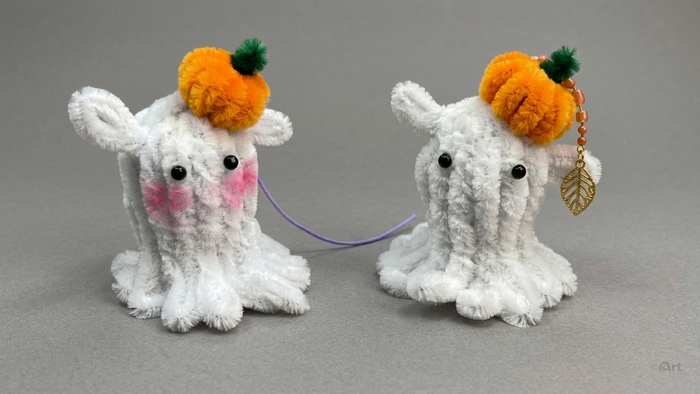
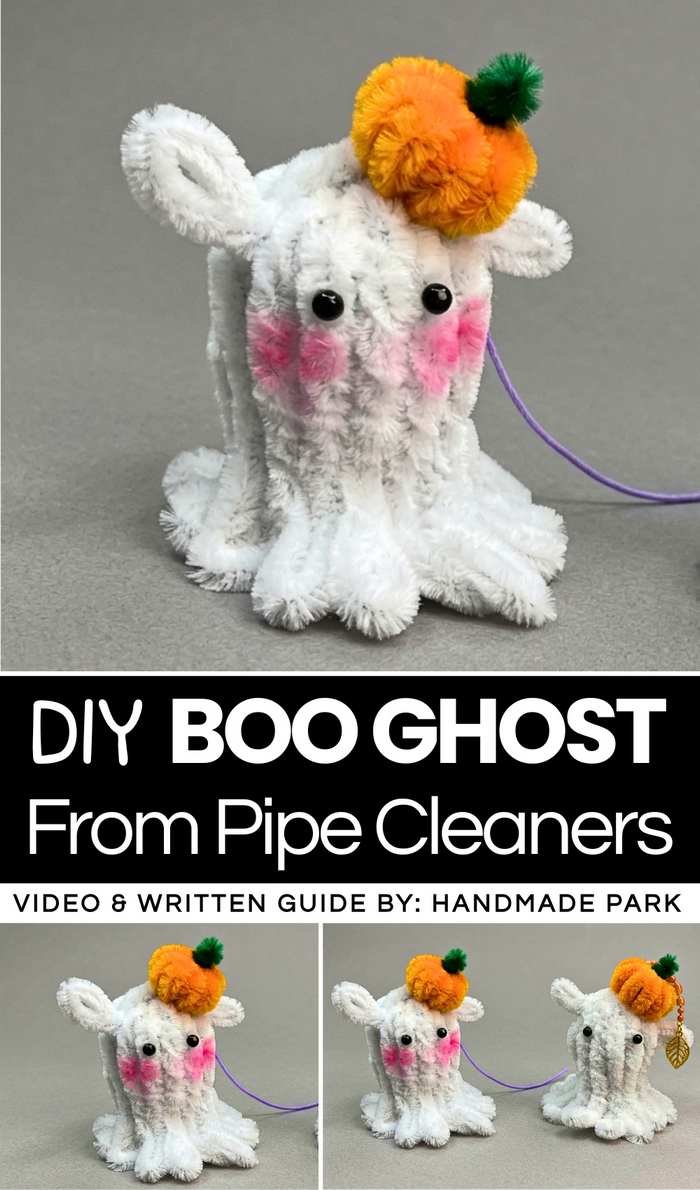
In this step-by-step pipe cleaner crafting class, you will learn how to DIY a blushing, ready-to-spook BOO ghost plushie out of only pipe cleaners! Two NEW features this chenille stem ghost plush has are the pipe cleaner pumpkin hat and the UNIQUE pose (arms ready to spook, but it is a CUTIE). You can make this GHOST plush your desk buddy or attach a keyring to have a SPOOKY-CUTE trick-or-treating bag charm. You can also crochet a spider + spiderweb using pipe cleaners to complete a Halloween decoration spooky set.
For Halloween decoration, insert a battery-charged tealight in your Halloween pipe cleaner BOO ghost plushie to turn it into a glow-in-the-dark lantern. Making one ghost plushie would only require 10 pipe cleaners in total.
Soon, you will also learn how to make a monster claw that can also be used to decorate this Halloween BOO ghost plushie. Note that I have also shared many guides for making a paper ghost + yarn ghost + the fabric ghost plushies, too. Now, continue reading to learn more about this Halloween baby ghost plushie project along with a video and written guide, too.
Tutorial to Make a Halloween Spooky Ghost
Skill Level: Beginner – Level 1
Materials Needed
-
White Pipe Cleaners (8 wires): These will form the main body and structure of your ghost.
-
Orange Pipe Cleaner (1 wire): Used for the body of the tiny pumpkin.
-
Green Pipe Cleaner (1 wire): Used for the pumpkin’s stem and leaf.
-
Small Black Beads or Glue-on Eyes: For the ghost’s facial features.
-
Pink Blush or a Pink Marker: To add a touch of color to the cheeks.
-
Hot Glue Gun and Glue Stems: For securing parts and adding details.
-
Scissors: High-quality craft scissors for cutting wire.
-
A Small Cylindrical Object: Such as a plastic straw, pen, or a thin tube for shaping the pumpkin.
-
Keychain Hardware (Optional): If you wish to turn your creation into a charm.
Beginner? Learn with the Video Tutorial
Phase 1: Constructing the Ghost’s Skeletal Base
The first step is to establish the core structure of the ghost.
-
Prepare the Ties: Take one of your eight white pipe cleaners. Use your scissors to cut it exactly in half. You will now have two shorter pieces of approximately equal length. Set one of these aside; it will be used later.
-
Bundle the Body: Gather the remaining seven long white pipe cleaners and align them perfectly so their ends are flush.
-
Secure the Center: Take the half-piece of white pipe cleaner you just cut. Wrap it tightly around the center of the seven-wire bundle. Twist the ends of the short piece together several times to ensure the bundle is held firmly. This center point will eventually become the very top of the ghost’s head.
-
Spread the “Tentacles”: From the central tie, spread out the fourteen ends (seven from each side of the tie) so they look like the legs of a spider or a starburst pattern. This provides a clear workspace for the next phase of construction.
Phase 2: Creating the Volume of the Head
To give the ghost its rounded head and the illusion of a draped fabric, we use a loop-folding technique.
-
The Loop Fold: Starting with one of the spread-out “legs,” fold the end of the wire back toward the central tie. Instead of folding it flat, create a small, rounded loop about an inch long.
-
Repeat for All Strands: Systematically go around the bundle, folding each of the fourteen wire ends into these loops. Ensure the loops are roughly the same size to maintain symmetry.
-
Defining the Crown: Once all wires are looped, you will have a dense, fuzzy circle of loops. This forms the “crown” of the ghost. Press them together slightly to fill in any gaps, creating a solid, dome-like appearance for the top of the head.
Phase 3: Shaping the Cloak-like Body
This is where the ghost begins to take its iconic, flowing shape.
-
The Neck Wrap: Take the second half-piece of white pipe cleaner that you cut at the beginning. Place it just beneath the loops you just created. Wrap it tightly around the entire bundle of wires gathered below the loops. This creates a “neck” and allows the head to sit prominently at the top.
-
Forming the Body: Now, take the long ends of the wires that are hanging down from the neck. Instead of letting them hang straight, you will manipulate them to create volume.
-
Tucking for Volume: Take several of the wires and fold them upward and under the head loops, then back down. This layering adds bulk to the upper body.
-
The Flowing Skirt: With the remaining wires, pull them downward and slightly outward. The goal is to create a bell-shaped “skirt.” Use your fingers to curve the wires so they look like fabric draping over an invisible form.
-
Refining the Bottom Edge: To give the ghost a “floating” look, take the ends of the wires at the bottom of the skirt and fold them inward or curl them slightly. This creates a wavy, organic hemline rather than a flat, sharp edge.
-
Trimming Excess: If any wires are significantly longer than others or if the body looks too bulky in one area, use your scissors to carefully trim away small sections. Remember to tuck any sharp wire ends back into the fuzzy chenille to prevent scratches.
Phase 4: Adding the Ears and Final Shaping
-
Ear Placement: Look at the top of the head. Select two wires near the top (or use the ends of the wire used for the neck if they are long enough) and fold them into small, upright loops. These act as the ghost’s ears, giving it a characterful, almost bunny-like appearance.
-
The Final Squish: Gently squeeze the body and head to ensure everything is secure and the shape is aesthetically pleasing. The pipe cleaners are very pliable, so you can easily adjust the “flow” of the ghost’s cloak until you are satisfied.
Phase 5: Crafting the Miniature Pumpkin Accessory
No Halloween ghost is complete without a pumpkin accessory.
-
The Orange Coil: Take your orange pipe cleaner. Hold your cylindrical object (like a straw) in one hand. Start wrapping the orange wire tightly around the cylinder in a continuous spiral.
-
Removing the Coil: Once the entire wire is wrapped, slide the resulting orange coil off the cylinder. You now have a spring-like tube.
-
The Stem and Leaf: Cut a small piece (about two inches) of the green pipe cleaner. Insert it through the center of the orange coil.
-
Transforming into a Sphere: Take the ends of the green wire and fold them over the ends of the orange coil to lock it in place. Now, take the orange coil and gently compress it from the ends towards the center. As you squish the coil, the rings will expand outward, forming a rounded, pumpkin-like sphere.
-
Shaping the Top: Twist one end of the green wire into a tiny loop to look like a leaf, and leave a small section pointing up as the stem.
Phase 6: Assembly and Character Details
Now it is time to bring your ghost to life.
-
Attaching the Pumpkin: Heat up your glue gun. Apply a small bead of glue to the bottom of your miniature pumpkin. Press it firmly onto the top of the ghost’s head, nestled slightly between the “ears.” Hold it for a few seconds until the glue sets.
-
Giving Sight: Apply two tiny dots of hot glue to the front of the head, positioned where eyes should be. Carefully place your black beads or googly eyes onto the glue.
-
Adding a Rosy Glow: To make the ghost look friendly and cute, take a bit of pink blush on a cotton swab (or a pink marker) and very gently dab it onto the “cheeks” just below the eyes. This subtle touch of color adds a great deal of personality.
-
Final Flourish (The Keychain): If you are making a charm, open the jump ring of your keychain hardware. Thread it through the central tie at the very top of the ghost’s head (near the pumpkin). Close the ring securely.