


Below are 7 ways to craft low-budget pink rose bouquets with elegant variations of bouquet wraps and rose arrangements.
And with shades of pink like magenta, baby pink, golden red, and wine, these rose bouquets will bring a coquettish aesthetic to your present. Craft them for weddings, anniversaries, and graduation.
Way #1: Craft A Keychain Pink Rose Bouquet

This will be a 9-rose mini pink flower bouquet for which you need the special “antique satin ribbon.” Unlike the wedding ribbon, the pink roses will have a basketweave texture that looks rich and classy.
To craft each rose, just wrap the ribbon around a skewer and keep on gluing the petal inners. This is the easiest method to craft a satin ribbon rose.
This will feature the wedding ribbon with the bordered cellphone. But before, wrap the blooms with the wine color snow dot mesh. You can also try it in red and black.
Way #2: Craft A Rose Bouquet with Heart Arrangement

With the heart arrangement of satin roses in two shades of pink, this big rose bouquet is REALLY PERFECT for weddings.
Another reason it will be a wedding must-try is the white bouquet wrap, which is round and has ruffled edges. This has always been a trendy form of bouquets for weddings.
You need 7 roses in pink, and 13 roses in rose gold. For each petal, take 2.5cm by 6cm strips from the ribbon. Use the white tulle for wrapping with pink ribbon, some cardboard, and Styrofoam.
Way #3: Craft A Glitter Pink Rose Bouquet
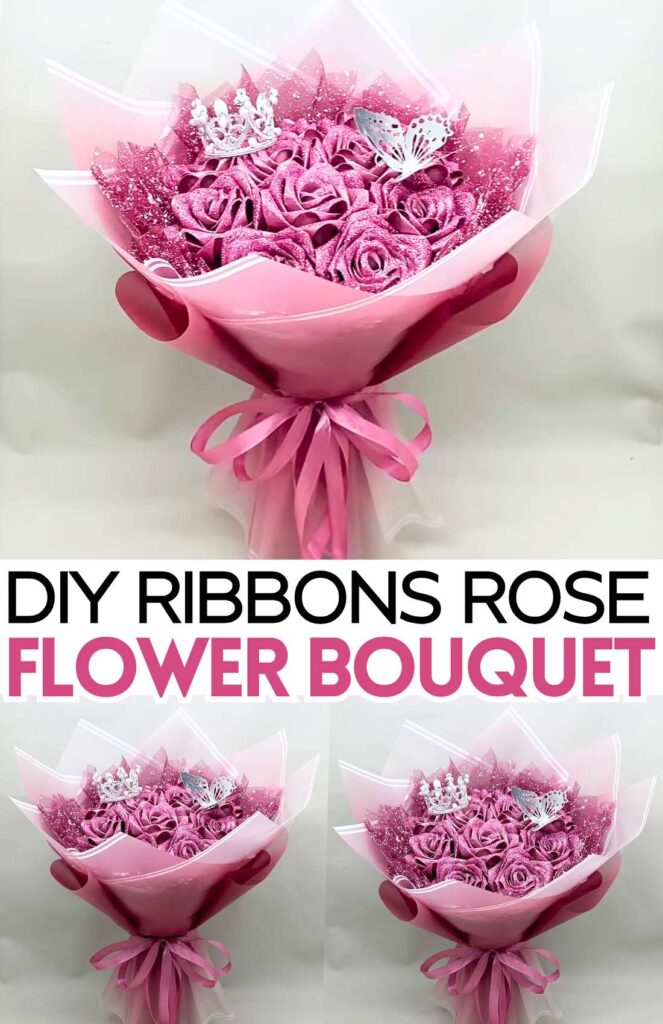
The satin ribbon roses in this pink rose bouquet are larger, glittery, and arranged in a circular pattern. To make your satin ribbon glitter, mix some glitter powder with liquid glue.
You can use a spare brush for strokes of glitter glue. (Remove the glue from the brush as soon.)
For crafting these bulkier roses, take strips of ribbon in the business card measurements and use a lighter to make the petals.
This mainly needs folding the corners. 4-ring of petals will be enough for each rose.
Cut a cardboard, make a cylinder, attach a Styrofoam to make the base for the bouquet. This bouquet will be special.
Way #4: Craft A Pink Rose Bouquet in Two Shades

Baby pink and magenta roses look so classy when arranged in a bouquet. However, the feature to stress in this rose bouquet is the cellophane bouquet wrap.
The idea is to use a solid pink and a solid white cellophane sheet, with the latter having a pattern in a looped arrangement.
This makes an attractive illusion when seen from the top of the bouquet. You need 19 or 20 roses in total 6 of which will be in baby pink. This arrangement and bouquet is a must-learn.
Way #5: Craft A Pink Rose Bouquet in Three Shades
Grab the golden yellow, golden red, soft peach, and baby pink satin ribbons for crafting this rose bouquet. This is the first rose bouquet with blooms in different heights.
You may have guessed right; this is the Korean bouquet wrap. In the large size, this will be the first one we may have discussed.
In this wrap, the back of the flowers will be high covered with cellophane sheets. Choose white semi-transparent ones with a solid outline.
The double-knot ribbon will look quite good on it. Craft 3 roses per color (total of 9).
Way #6: Craft A Pink Rose Bouquet in Three Shades
A thin flannel sheet has a little rough texture that can make a craft flower look more natural. This single flower bouquet has a simple flannel flower that you can make just by gluing petals.
Begin with 4.5cm by 6cm, 4cm by 5.5cm, and 3.5cm by 5cm cutouts from your fabric.
This will provide you with enough petal variation. Craft your flower around a bamboo skewer using hot glue. Just make sure you have enough petals.
I guess 5 per size of cutout are needed. From the fabric sheet, also cut the leaves and glue them onto it.
To make the wrap, you again need a satin ribbon for the bow, cellaphone, and some snow dot mesh.
Way #7: Craft a Pink Bouquet Wrap
You can also craft a Korean bouquet wrap in pink for a coquette aesthetic using cellophane sheets, ribbon, and pipe cleaners (for flowers).
The hidden part is making a hollow cardboard cuboid base for holding part of the bouquet.
You can then insert the stems of your flowers of inside a Styrofoam (carefully cut it) and put it inside this base. I also recommend using the snow dot pink mesh sheet as a layer.