
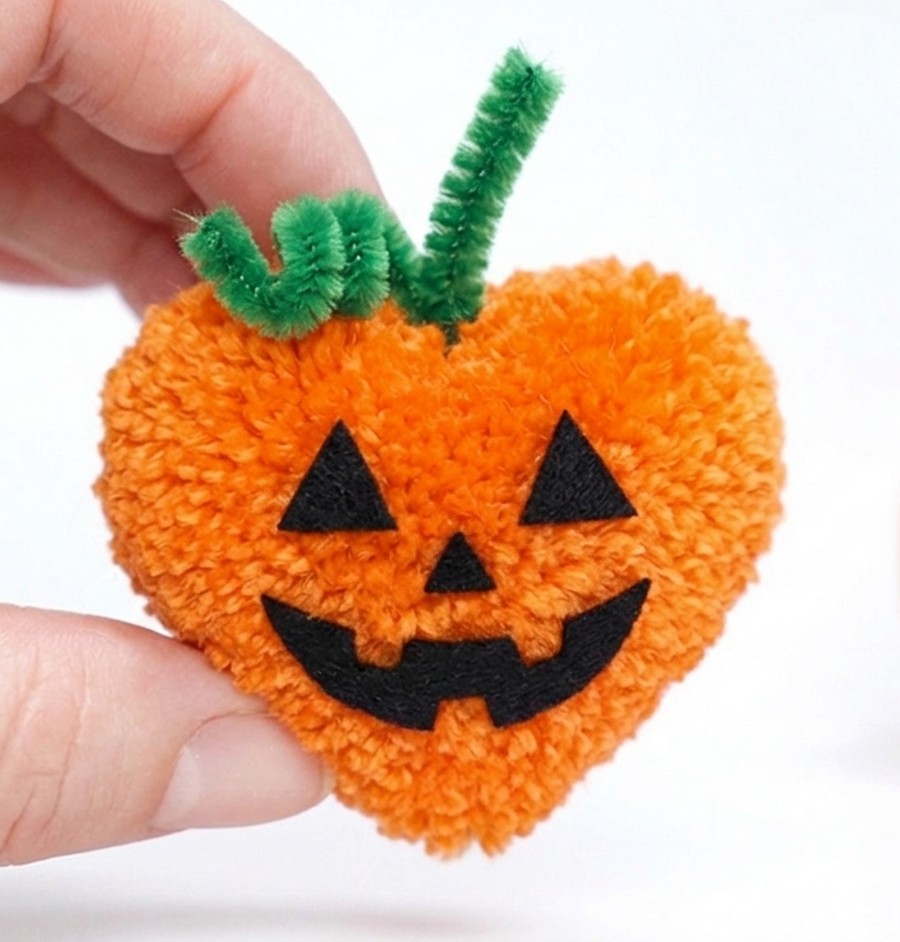
Looking for a HALLOWEEN-THEMED love present for your favorite one? Learn how to DIY this cute, spooky Halloween jack-o’-lantern heart plushie present using some orange cotton yarn, felt, a pipe cleaner, and a keyring. The receiver can turn this crochet heart with a spooky face into a bag charm, stress softie, and even add it to the middle of their Halloween yarn plushie garland.
While I have shared tons of other pumpkin plushie patterns, this is the most different, cute, and makes the best Halloween present.
You can also craft the heart just like the heart plushie in red or pink as a Valentine’s Day present. For now, you will learn this incredibly cute heart pumpkin that is small and won’t take more than 10 minutes.
[ez-toc]
Tutorial to DIY A Halloween Heart Plushie Using Yarn
This guide will show you how to make a soft, cute Jack-o’-Lantern Heart using simple tools and materials you have at home.
About the Project
Making a Jack-o’-lantern pom-pom heart is a fun, festive Halloween craft. You start by creating a classic orange pom-pom heart using a fork, yarn, and scissors. Then, you bring it to life by adding black felt facial features and a green pipe cleaner stem and coiled vine!
Detailed Step-by-Step Instructions
Step 1: Get Your Materials
You will need:
-
Orange soft yarn (acrylic or wool blend)
-
Black felt sheet (or black paper/fabric)
-
Green pipe cleaner (chenille stem)
-
Standard kitchen fork
-
Sharp scissors
-
Needle & string/yarn
-
Craft glue or hot glue
Step 2: Prepare the Fork
Cut a short piece of orange yarn, about 20 centimeters long. Place this piece between the middle two prongs of the fork so it sits in the center. Let the ends hang down on both sides.
Step 3: Wrap the Orange Yarn
Take the end of your orange yarn. Start wrapping it around all four prongs of the fork. Wrap it around and around in the same spot to build up a thick layer. Wrap it 150 times until you have a large, thick bundle of yarn on the fork. Cut the yarn from the main skein.
Step 4: Tie the Center Bundle
Take the two ends of the short piece of yarn placed in Step 2. Bring them up and over the thick bundle. Tie a very tight knot right in the middle of the wrapped yarn while it is still on the fork.
Step 5: Secure the Bundle
Slide the bundle of yarn off the fork. Wrap the same short piece of yarn around the bundle one more time and tie another knot as tight as you can.
Step 6: Create the Heart Indentation
To get the classic “dip” at the top of the heart, take a needle with a new piece of yarn. Pass the needle through the top center of your bundle and pull it through the bottom center. Pull this yarn tight so the top middle of the bundle dips down towards the center. Tie it securely.
Step 7: Cut the Loops
Use your scissors to cut through every single loop of yarn on the outside of the bundle until it expands into a fluffy ball.
Step 8: Sculpt the Bottom & Top Lobes
-
Bottom: Hold the pom pom by the top. Trim the bottom part into a tapered “V” shape or point to create the tip of the heart.
-
Top: Trim the top fluff into two smooth curves following the center dip you created.
Step 9: Smooth the Surface
Continue making small, quick snips all over the heart to make the yarn surface dense, velvety, and evenly shaped.
Step 10: Add the Stem and Vine
-
Take a green pipe cleaner and fold/cut a piece about 3–4 inches long.
-
Coil one end around a pencil or your finger to create a curly vine, leaving a short straight section next to it to act as the stem.
-
Apply a small dot of glue to the base of the pipe cleaner stem and push it into the top center dip of the heart until secure.
Step 11: Create & Attach the Jack-o’-Lantern Face
-
Cut out facial features from your black felt:
-
Eyes: Two large triangles.
-
Nose: One small triangle.
-
Mouth: A wide jagged smile with cut-out square teeth.
-
-
Apply a small amount of fabric glue or hot glue to the back of each felt piece and gently press them onto the front of your orange heart.
Step 12: Add a Hanging Loop (Optional)
If you want to turn your pumpkin heart into an ornament, thread a piece of yarn through the top near the stem using a needle and tie the ends together to make a loop.