
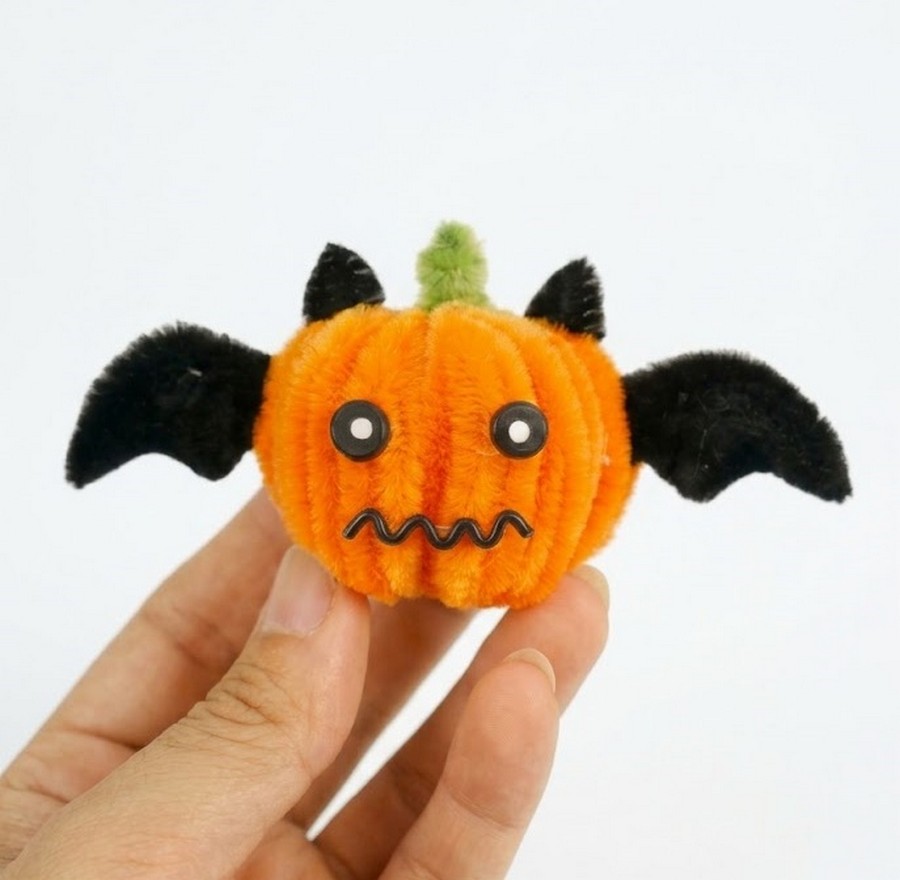
In today’s DIY pipe cleaner buddies plushies, learn how to make a cute bat pumpkin using pipe cleaners. Craft it as a small keychain or treat bag charm. We will first fold orange pipe cleaners into four-centimeter loops and wrap them tightly to create six curved pumpkin segments.
Glue the segments together into a round hollow pumpkin ball.
Make Bat Winged Pumpkin Plushie Miniature

Next, roll a green pipe cleaner into a small stem and glue it to the top. Then, bend and trim black pipe cleaners to create two scalloped bat wings and two pointed ears. Glue the wings, ears, craft eyes, and a small black zigzag wire mouth onto the pumpkin to complete the figure.
Make the Pipe Cleaner Bat Pumpkin Plushie for Halloween
Difficulty Level
-
Level: Easy to Intermediate
-
Why: The project requires measuring with a ruler, uniform wrapping, and careful scissor trimming to sculpt the wings. Assembling curved segments symmetrically with hot glue needs patience, but the steps are repetitive and do not require advanced craft skills.
Materials & Bending Techniques
-
Bending & Shaping Techniques Used: This is a pipe cleaner craft rather than paper origami. The wire shaping techniques include:
-
Loop Folding: Measuring and doubling the wire to create a 4 cm core.
-
Layered Wire Wrapping: Wrapping pipe cleaners tightly around the core loop to make dense, solid petals.
-
C-Curve Bending: Bending flat petals into curved pumpkin ribs.
-
Scallop Pleating: Bending wire back and forth to shape bat wings.
-
Triangle Folding: Bending short pieces into sharp points for ears.
-
Zigzag Bending: Creasing wire into a wavy mouth line.
-
Scissor Sculpting: Trimming fuzzy edges to define wing scallops and ear points.
-
-
Materials:
-
Orange pipe cleaners (for pumpkin body)
-
Green pipe cleaner (for stem)
-
Black pipe cleaners (for wings, ears, and mouth)
-
2 small round craft eyes (white with black pupils)
-
Hot glue gun and glue sticks
-
Scissors
-
Rule.
-
Learn to Make the Pipe Cleaner Plush
Better learn the whole method of making this plush pumpkin using pipe cleaners in this tutorial:
Frame-by-Frame Quick Guide
-
00:00 – 00:10: Preview of the finished bat pumpkin figurine.
-
00:11 – 01:14: Take an orange pipe cleaner, bend a 4 cm loop using a ruler, and wrap the remaining wire back and forth around the loop until it forms a thick petal. Curve it into a C-shape. Repeat to make six identical orange slices.
-
01:15 – 02:44: Apply hot glue along the inner edges of the orange slices and join all six pieces side by side to form a hollow, ribbed pumpkin sphere.
-
02:45 – 03:15: Fold a short piece of green pipe cleaner back and forth into a tight small plug, add hot glue to the top center hole of the pumpkin, and insert the stem.
-
03:16 – 05:19: Cut a black pipe cleaner in half, measure 5 cm, and bend it into scalloped loops to form a bat wing. Use scissors to snip the fuzzy edge into three distinct bat wing points. Repeat to make a second matching wing.
-
05:20 – 05:46: Fold two short black pipe cleaner pieces into sharp triangles, then trim the edges with scissors to make two pointed ears.
-
05:47 – 06:12: Hot glue one black wing to the left side and one black wing to the right side of the pumpkin.
-
06:13 – 06:21: Glue the two pointed black ears to the top rim next to the green stem.
-
06:22 – 06:33: Apply two drops of hot glue to the front and press two round craft eyes into place.
-
06:34 – 06:42: Bend a thin black pipe cleaner wire into a jagged zigzag smile and glue it below the eyes.
-
06:43 – 07:11: Display the finished Halloween bat pumpkin.