
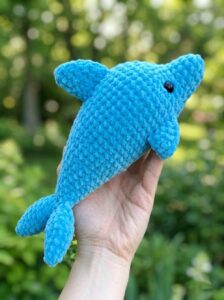
Learn how to crochet a no-sew & miniature baby shark plushie in any color with this pattern. It looks even cuter than the red velvet shark and blue shark plushie. The dorsal fin’s shape somehow looks odd but CUTE at the same time. Crochet this mini shark plush as a bag charm for your beach tote bag.
You can prepare a handful of them (make a trio of green, yellow, and blue) within an hour. We shall crochet it using the thin plush yarn, which makes this shark plushie palm-sized.
There is also a white belly and embroidery spots, which make it look simply adorable. You can also make it a car hanger while going on a beach trip this summer. Now, continue reading to learn the full pattern to crochet this plush shark from the Shark Week Crochet series.
[ez-toc]
Free Crochet No-Sew Shark Pattern: Written Instructions
Here is the complete crochet pattern for the adorable amigurumi shark that is no-sew. The pattern is written in standard US Crochet Terms.
Abbreviations
- MR: Magic Ring
- sc: Single crochet
- ch: Chain
- sl st: Slip stitch
- inc3 (W): 3 single crochet into the same stitch (3-sc increase)
- dec (A): Invisible decrease (2 sc together)
- sc3tog (M): Invisible 3-single-crochet decrease (3 sc together into 1)
- sts: Stitches
1. Side Fins (Make 2)
Do not stuff the fins. Use the main body color (e.g., blue or green).
- Rnd 1: MR, 4 sc (4)
- Rnd 2: 1 inc3, 3 sc (6)
- Rnd 3: 1 sc, 1 inc3, 4 sc (8)
- Rnd 4: 2 sc, 1 inc3, 5 sc (10)
- Rnd 5: 10 sc (10)
- Fasten off, leaving a tail if you prefer sewing, or hide the tail if you plan to crochet them directly into the body.
2. Tail Fins
Large Tail Fin
- Rnds 1–5: Repeat the exact same steps as the Side Fin.
- Rnd 6: 10 sc (10)
- Fasten off, leaving a 15 cm tail for sewing later. Do not stuff.
Small Tail Fin
- Rnd 1: MR, 4 sc (4)
- Rnd 2: 1 inc3, 3 sc (6)
- Rnd 3: 1 sc, 1 inc3, 4 sc (8)
- Rnd 4: 8 sc (8)
- Fasten off, leaving a tail for assembly. Do not stuff.
3. Main Body & Head
Start with the main body color. The piece is worked from the tail end up toward the head.
- Rnds 1–4: Repeat Rnds 1–4 of the Side Fin pattern. (10 sts at the end of Rnd 4)
- Rnd 5: 3 sc, 1 inc3, 6 sc (12)
- Rnd 6: 4 sc, 1 inc3, 7 sc (14)
- Rnd 7: 5 sc, 1 inc3, 6 sc, 1 inc3, 1 sc (18)
- Rnd 8: 6 sc, 1 inc3, 8 sc, 1 inc3, 2 sc (22)
- Rnd 9: 7 sc, 1 inc3, 10 sc, 1 inc3, 3 sc (26)
- Rnd 10: 8 sc, 1 inc3, 12 sc, 1 inc3, 4 sc (30)
- Rnd 11: 9 sc, 1 inc3, 14 sc, 1 inc3, 5 sc (34)
- Rnd 12: 10 sc, 1 inc3, 16 sc, 1 inc3, 6 sc (38)
- Rnd 13: 11 sc, 1 inc3, 18 sc, 1 inc3, 7 sc (42)
- Rnd 14: 42 sc (42)
- Rnd 15: 11 sc, 1 sc3tog, 18 sc, 1 sc3tog, 7 sc (38)
Rnd 16: Attaching the Side Fins
In this round, you will crochet through both the flat edges of the side fins and the body stitches to join them seamlessly.
- Crochet 1 inc (where the 2nd sc goes through both the first fin and body), then 4 sc through both the fin and body.
- 5 sc along the body.
- 1 sc3tog on the body.
- 4 sc along the body.
- Attach the second fin: 4 sc through both the fin and body, then 1 inc (where the 1st sc goes through the fin and body).
- 7 sc along the body.
- 1 sc3tog on the body.
- 6 sc along the body. (36 sts)
- Change yarn to white on the very last slip stitch of this round.
Belly Area (White Yarn)
- Rnd 17: 10 sc, 1 dec, 16 sc, 1 dec, 6 sc (34)
- Rnd 18: 1 dec, 8 sc, 1 dec, 6 sc, 1 dec, 6 sc, 1 dec, 6 sc (30)
- Rnd 19: (2 sc, 1 dec, 2 sc) x 5 (25)
- Rnd 20: (3 sc, 1 dec) x 5 (20)
- Stuffing: Pause here to stuff the body firmly with fiberfill.
- Rnd 21: (1 sc, 1 dec, 1 sc) x 5 (15)
- Rnd 22: (1 sc, 1 dec) x 5 (10)
- Fasten off, weave through the front loops of the remaining 10 stitches, pull tight to close, and hide the yarn tail.
4. Assembly & Details
- Sewing the Tail: Flatten the tail fins. Sew the flat/straight edge of the
Large Tail Fin facing downwards onto the starting rows of the main body.
Sew the Small Tail Fin right beneath it with its straight edge facing upwards,
creating a classic shark tail shape. - Embroidering Gills: Use thin black yarn or embroidery floss to make 2–3 small,
slanted lines right in front of each side fin. - Eyes: Place and secure safety eyes or glue down flat plastic eyes
symmetrically on both sides of the head, just above the gill lines.