
Subscribe to KnittingHouseSquare.
If you know how to knit, you can craft this easy, ribbed pumpkin for your autumn decoration with the following step-by-step tutorial. Introducing the UMTIMTE method to DIY a pumpkin out of a knitted rectangle. We have already discussed the hand-sewn fabric, crocheted, and even no-knit pumpkins. Decorate your coffee table, porch, front door (for Thanksgiving), or craft table with these calming pumpkins.
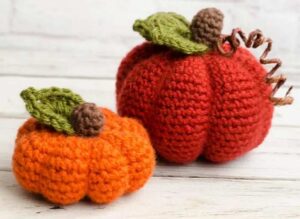
But nothing beats the durability, texture, and beauty of a knitted pumpkin like this. You can also make a bigger pumpkin in earthy brown, a medium pumpkin in yellow with a texture, and a smaller pumpkin in orange and present them as a stack.
The bigger knitted pumpkin is perfect for using as a pouf, while the smaller one can be used as a pincushion. These pumpkins have an even better texture than a ribbed fall crochet pumpkin. Now, continue reading to learn about this Halloween and fall decor project and find the step-by-step tutorial for beginners.
Materials Needed
-
Yarn: Worsted-weight (Category 4) yarn in pumpkin color (e.g., Lion Brand Vanna’s Choice in Terracotta) and a small amount of brown/contrast yarn for the stem.
-
Needles: US Size 9 (5.5 mm) straight or circular needles (or whatever size matches your yarn’s tag).
-
Notions:
-
6 Stitch markers
-
Tapestry needle
-
Scissors
-
Polyfill stuffing
-
Feels Difficult? Follow the Detailed Video Tutorial
Abbreviations
-
K: Knit
-
P: Purl
-
KFB: Knit front and back (increase)
-
M1: Make one (increase using the bar between stitches)
-
SSK: Slip, slip, knit (left-leaning decrease)
-
K2T: Knit 2 together (right-leaning decrease)
-
P2T: Purl 2 together
-
[ ] / *: Repeat instructions between brackets/asterisks as indicated.
Instructions
Part 1: Main Pumpkin Body
Cast On & Setup (Increases)
-
Cast On: Cast on 14 stitches using the Backward Loop Cast-On method, leaving a 12-inch tail.
-
Row 1: K1, [KFB] to last st, K1 (26 sts).
-
Row 2: Purl all stitches.
-
Row 3: K1, [KFB] to last st, K1 (50 sts).
-
Row 4: Purl all stitches.
Rib Section Increases (Placing Markers)
-
Row 5: K1, K1, M1, K5, M1, K1, P1, place marker, repeat * to * 5 more times, K1 (62 sts total).
-
Row 6: P1, pass marker, K1, Purl to next marker, repeat * across, P1.
-
Row 7: K1, K1, M1, K7, M1, K1, P1, pass marker, repeat * across, K1.
-
Row 8: P1, pass marker, K1, Purl to next marker, repeat * across, P1.
-
Row 9: K1, K1, M1, K9, M1, K1, P1, pass marker, repeat * across, K1.
-
Rows 10–14: Continue expanding the section by repeating the established increase pattern until Row 14 is complete.
Straight Body Repeat Section
-
Repeat Row A (Right Side): K1, Knit to 1 st before marker, P1, pass marker, repeat * across, K1.
-
Repeat Row B (Wrong Side): P1, pass marker, K1, Purl to next marker, repeat * across, P1.
-
Work Repeat Rows A & B for a total of 7 times (14 total rows) to build the central height of the pumpkin.
Decrease Rows
-
Decrease Row 1: K1, K1, SSK, K11, K2T, K1, P1, pass marker, repeat * across, K1.
-
Decrease Row 2 & all even rows: P1, pass marker, K1, Purl to next marker, repeat * across, P1.
-
Decrease Rows 3–10: Continue working decrease rows in pattern (reducing middle knit section by 2 stitches every right-side row) until 4 stitches remain in each section.
-
Decrease Row 11: K1, SSK, SSK, K2T, P2T, pass marker, repeat * across, K1.
-
Decrease Row 12: P1, pass marker, K1, P3, repeat * across, P1.
-
Decrease Row 13: K1, SSK, P2T, remove marker, repeat * across, K1.
Finishing Pumpkin Fabric
-
Do not traditional cast off.
-
Cut a 24-inch tail.
-
Slip stitches to the opposite needle point, thread the yarn tail onto a tapestry needle, and thread through all remaining loops to secure them on the tail without pulling tight yet.
Part 2: Stem
-
Cast On: 8 stitches in brown yarn.
-
Stockinette Stitch: Work [Knit 1 row, Purl 1 row] until piece measures approx. 1.5 inches.
-
Increase Row 1: K1, M1, repeat to last st, K1.
-
Purl Row: Purl all stitches.
-
Increase Row 2: K1, M1, repeat to last st, K1.
-
Purl Row: Purl all stitches.
-
Increase Row 3: K1, M1, repeat to last st, K1.
-
Cast Off: Cast off all stitches purl-wise. Leave an 18-inch tail.
-
Stem Assembly: Fold stem fabric lengthwise and seam along the side using the cast-on tail.
Part 3: Assembly & Shaping
-
Seaming Body: Fold the body piece with right sides facing out. Use the Mattress Stitch along the edge columns to sew the flat piece into a vertical tube.
-
Bottom Cinching: Weave the cast-on tail around the bottom edge circle and pull tight to close.
-
Creating Ribs: Cut three long strands of yarn (4x the length of the pumpkin). Thread each strand down a purl column and up the opposite purl column.
-
Stuffing: Fill pumpkin generously with polyfill.
-
Cinched Top: Pull top gather-tail tight and knot securely.
-
Shaping: Tie opposite pairs of the long rib strands together at the top, pulling snug to create deep ridges/puckers along the sides. Knot securely and bury yarn ends inside.
-
Attach Stem: Sew the flared bottom ruffle of the stem to the top gathered opening of the pumpkin.
-
Curve Stem: Thread the remaining stem tail through the stem interior to pull one side down slightly, forming a natural curve, then secure.