
Subscribe to KnitsByS!
Note: If you are looking to DIY a retro pumpkin using knitting, follow the “easy method to knit a pumpkin” tutorial. Today, you will learn another method to knit a pumpkin; it is quicker, easier, and perfect when you want to make a tiered pumpkin fall decoration in the same sizes. This time, the method to knit the stem is even faster and simpler. Place your pumpkins on your porch, entryway, or use as a pincushion on your craft table.
To make a pumpkin centrepiece, you can craft 3 pumpkins following this easy method in the following colors: earthy red + green, dull aqua + white & orange + black. You can also craft a chunkier pumpkin by using the plush yarn.
These knitted pumpkins have the same ribbing pattern as a crochet pumpkin when made using the “sphere & stuff” method. You can also use the texture stitches on your way to make an even more elegant crochet pumpkin plush. Also, note that if you are looking for a fabric pumpkin, you can check the other guides as well.
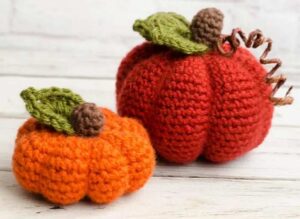
Tutorial to Knit A Ribbed Pumpkin Plushie
This guide covers how to knit the pumpkin body, shape its segments, and create a custom stem. This project is an easy way to make soft, cute fall decorations for your home. You will knit a soft yarn tube in a circle, close one end, stuff it, and wrap yarn around the outside to make six pumpkin sections. To finish, you will knit a small brown stem and sew it onto the top.
Materials Needed
-
Yarn: DK weight yarn in your chosen pumpkin color (e.g., orange, sage green, or burgundy). Scrap yarn in brown, black, or dark green for the stem.
-
Knitting Needles: 6mm (US 10 / UK 4) circular needles and a set of double-pointed needles (DPNs) for the stem.
-
Tools: Stitch marker, darning needle, scissors, and measuring tape.
-
Stuffing: Soft toy filling, scrap yarn, or fabric scraps.
Beginner? Follow Along the Video Tutorial
Part 1: Knitting the Pumpkin Body
1. Casting On
-
Leave a generous tail end (about 20-30 inches) and cast on 72 stitches using the long-tail cast-on method.
-
Join your stitches in the round, being careful not to twist the ridge on the inside.
2. The Pattern
-
To create the natural ridges of a pumpkin, follow this simple repeat: Knit 11 stitches, Purl 1 stitch.
-
Repeat this pattern 6 times to complete one round. Place a stitch marker at the beginning of the round to keep track.
-
Note: The single purl stitches will create the vertical indentations for the pumpkin segments.
3. Knitting the Height
-
Continue knitting in the “Knit 11, Purl 1” pattern until your work measures between 15 cm to 20 cm (6–8 inches) in height.
-
Pro-Tip: For a smaller pumpkin, use thinner yarn, smaller needles, and fewer stitches. For a larger pumpkin, use chunkier yarn and needles with more stitches.
Part 2: Assembly and Shaping
1. Cinching the Top
-
Cut your working yarn, leaving another long tail. Thread this tail onto a darning needle.
-
Carefully slip all the stitches from your knitting needles onto the darning needle.
-
Pull the yarn tight to cinch the top of the pumpkin closed. Sew a few extra stitches across the opening to secure it.
2. Stuffing
-
Fill the pumpkin body generously with your chosen stuffing. Make sure it is firm enough to hold its shape but soft enough to be squashed down later.
3. Cinching the Bottom
-
Thread the long tail from your cast-on edge onto the darning needle.
-
Weave the needle in and out of the cast-on stitches all the way around the bottom opening.
-
Pull tight to cinch the bottom closed and secure it with a few knots.
4. Creating the “Squash” Shape
-
To get that classic flattened pumpkin look, pass your darning needle through the center of the pumpkin from the bottom to the top.
-
Pull the yarn tight to compress the height.
-
To emphasize the segments, wrap the yarn around the outside of the pumpkin, aligning it with the purl columns. Pull tight and anchor the yarn back through the center. Repeat this for all six segments. Secure the yarn and hide the tail inside the pumpkin.
Part 3: Making and Attaching the Stem
1. Knitting the I-Cord Stem
-
Using your scrap yarn and DPNs, cast on 3 stitches.
-
Knit 3. Instead of turning the needle, slide the stitches back to the other end of the DPN.
-
Bring the yarn across the back and knit the stitches again. This creates a round “I-cord.”
-
Continue until the stem is your desired length (usually 2–3 inches).
2. Finishing the Stem
-
Cast off the stitches.
-
Thread the yarn tail through the center of the cord using a darning needle to hide it, then trim.
3. Attachment
-
Using the remaining tail from the stem, stitch the base of the stem firmly onto the top center of your pumpkin.
-
Tie off and hide the remaining threads inside the pumpkin body.
Your knitted pumpkin is now complete! Experiment with different colors and textures to create a beautiful autumn display.